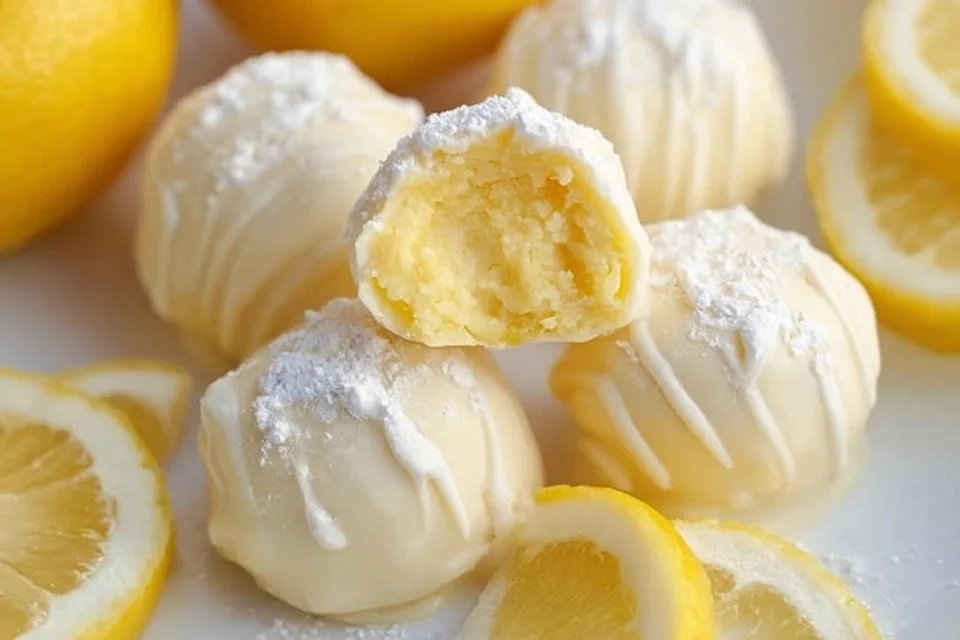
There’s something satisfying about whipping up a simple treat that brings a bit of brightness to your day. Whether it’s after a busy workday, during a relaxed weekend, or shared with friends and family during gatherings, these Lemon Truffles are an ideal choice. They are comforting yet refreshing, balancing creamy texture with zesty flavor. The best part is that this recipe is straightforward, making it accessible for any home cook. Let’s dive into it and create something delightful.
Why You’ll Love This Recipe Lemon Truffles
These Lemon Truffles are all about ease and reliability. They bring a wonderful, balanced flavor profile that combines creaminess with a fresh citrus zing. This recipe is practical, making it perfect for everyday snacks or a sweet surprise after dinner. Plus, the flexibility in preparation allows you to customize them slightly while maintaining the classic truffle experience.
Kitchen Tools You’ll Need
- Mixing bowl
- Rubber spatula
- Measuring spoons
- Zester or grater
- Baking sheet or plate
- Parchment paper (optional)
Ingredients
- 4 oz cream cheese or coconut butter (adds creaminess)
- 2 tbsp butter or additional coconut butter (provides richness)
- 3 tbsp powdered sugar or erythritol (sweetens and thickens)
- Zest of one lemon (adds freshness and brightness)
- 3 oz white chocolate chips (optional for a sweeter touch)
- 1 drop natural food coloring or pinch turmeric (optional for color)
How to Make Lemon Truffles
Step 1. Start by gathering your ingredients so everything is ready for mixing. In a mixing bowl, combine the cream cheese or coconut butter with the butter or additional coconut butter. Use a spatula to mix them together until the mixture is smooth and well-combined, ensuring there are no lumps for a smoother end product.
Step 2. Add the powdered sugar or erythritol and the zest of one lemon to the bowl. Stir these ingredients in thoroughly, focusing on blending the sweetness with the citrus zest. You’ll want to achieve a consistent mixture that is creamy and slightly thick, which will give your truffles a delightful texture.
Step 3. If you’re using white chocolate chips, gently fold them into the mixture now. Make sure they are evenly distributed throughout the mixture without overmixing, which could affect the texture. The chips will provide additional sweetness and a creamy quality to your truffles.
Step 4. If desired, incorporate a drop of natural food coloring or a pinch of turmeric to enhance the appearance of your truffles. Stir gently just until the color is nicely blended into the mixture. This step is entirely optional, but it can make your truffles look even more appealing.
Step 5. Using your hands, take small portions of the mixture and roll them into balls. Aim for a consistent size for even presentation and a satisfying bite. As you roll, you may notice the mixture is soft but should hold its shape well, resulting in smooth, round truffles.
Step 6. Place the rolled truffles on a baking sheet or plate lined with parchment paper to keep them from sticking. Be sure to leave some space between each truffle, allowing for easy handling later. This is where they will chill, so don’t worry if they look a bit soft at this point; they will firm up in the fridge.
Step 7. Once all the truffles are on the sheet, cover them lightly with plastic wrap and refrigerate until firm, typically for about an hour. They should become more solid to the touch after chilling, making them easier to handle and enhancing the overall texture.

Serving Suggestions
Lemon Truffles are versatile enough to fit into many occasions. Enjoy them for breakfast alongside your coffee or as a sweet afternoon snack. They can also be a lovely addition to family meals, providing a light dessert option. If you have leftovers, they store well in the refrigerator, making them a delightful treat to grab whenever you crave something sweet.
Pro Tips for Best Results
- Chill Thoroughly: Make sure to allow enough chilling time for the truffles so they solidify properly.
- Roll Evenly: Aim for uniform sizes when rolling for a consistent bite and appearance.
- Experiment with Flavors: While this recipe is delightful as is, feel free to experiment with other zests or extracts that complement the lemon.
- Use Quality Ingredients: The flavor and texture will benefit from using good-quality butter and cream cheese or coconut butter.
- Monitor Consistency: If the truffle mixture feels too soft, chilling it longer can help improve the texture before rolling.
Common Mistakes to Avoid
- Overmixing the Mixture: This can make the truffles tough. Mix just until combined for a smoother texture.
- Skipping the Chilling Step: Not chilling the rolled truffles can lead to them losing shape. Refrigerating allows them to set properly.
- Using Room Temperature Ingredients: If your butter or cream cheese is too warm, it can make the mixture runny. Ensure they are at a suitable temperature before starting.
- Not Measuring Ingredients Accurately: This can throw off the balance of flavors. Use measuring tools for best results.
- Forgetting the Zest: The lemon zest adds crucial flavor. Make sure to include it for that bright citrus note.
- Not Storing Correctly: Leaving them uncovered or at room temperature can dry them out. Keep them refrigerated in a covered container.
Variations & Substitutions
Consider adding different citrus zest, like lime or orange, for a twist on flavor. If you want a chocolatey version, you could dip them in melted dark or milk chocolate after chilling. For a nutty flavor, incorporate finely chopped nuts into the mixture before rolling. You can also adjust the sweetener type according to your preference, for instance, using different types of natural sweeteners that fit your dietary needs.
Storage & Reheating
These truffles should ideally be stored in an airtight container in the refrigerator where they can maintain their firmness. They will keep well for up to a week. You can also freeze them for longer storage. To preserve their texture, thaw them in the refrigerator and enjoy them cold without reheating, as they are best served chilled.
Frequently Asked Questions
Can I make this recipe ahead of time?
Yes, these truffles can be made ahead of time. Prepare them and store them in the refrigerator for a convenient treat later in the week.
How long does it last in the fridge?
When stored in an airtight container, these truffles can last up to a week in the refrigerator without losing quality.
Can I freeze this recipe?
Absolutely! You can freeze the truffles for up to three months. Just make sure to store them in a sealed container to prevent freezer burn.
What can I substitute for one ingredient?
You can use coconut butter instead of cream cheese if you prefer a dairy-free option. Just keep in mind that it will alter the flavor and texture slightly.
Why didn’t my recipe turn out as expected?
Common reasons might include not mixing adequately or not chilling the mixture long enough. Ensure proper measurements and let the truffles firm up in the fridge.
Final Thoughts
Making Lemon Truffles is a simple and enjoyable process, and the result is a delightful treat that anyone can appreciate. They can easily fit into busy schedules and lend a bit of sweetness to everyday moments. Enjoy every step, from mixing to tasting, knowing that a comforting, zesty bite awaits.

Lemon Truffles
Ingredients
Truffle Base
- 4 oz cream cheese or coconut butter adds creaminess
- 2 tbsp butter or additional coconut butter provides richness
- 3 tbsp powdered sugar or erythritol sweetens and thickens
- 1 piece zest of one lemon adds freshness and brightness
- 3 oz white chocolate chips optional for a sweeter touch
- 1 drop natural food coloring or pinch turmeric optional for color
Instructions
Preparation
- Gather your ingredients in a mixing bowl, combining the cream cheese or coconut butter with the butter until smooth.
- Add the powdered sugar or erythritol and lemon zest, stirring until creamy and slightly thick.
- If using white chocolate chips, fold them in gently, ensuring they are well distributed.
- Optional: Incorporate natural food coloring or turmeric for enhanced appearance.
- Roll the mixture into small balls, aiming for a consistent size.
- Place the rolled truffles on a parchment-lined baking sheet, leaving space between each one.
- Cover lightly and refrigerate for approximately an hour until firm.

Leave a Reply