Oreo Dump Cake
Oreo Dump Cake is a simple yet delightful dessert that combines the flavors of chocolate and cookies into a rich, layered treat. It’s an excellent choice for weeknights, weekends, family meals, or just to enjoy during simple moments. The ease of preparation makes it a comforting and reliable option for everyday cooking. Let’s dive into this recipe that brings together familiar ingredients in a stress-free way.
Recipe Overview
This recipe results in a creamy, chocolatey dump cake that is both satisfying and indulgent. The combination of crushed Oreo cookies, sweetened condensed milk, and chocolate cake mix creates a moist and textured dessert that pleases the palate. The simplicity of the preparation means it fits seamlessly into any home-cooking routine, making it a favorite for casual gatherings and family nights.
Kitchen Tools
- Mixing bowl
- Baking dish
- Spoon or spatula
- Measuring cup
- Knife
Ingredients
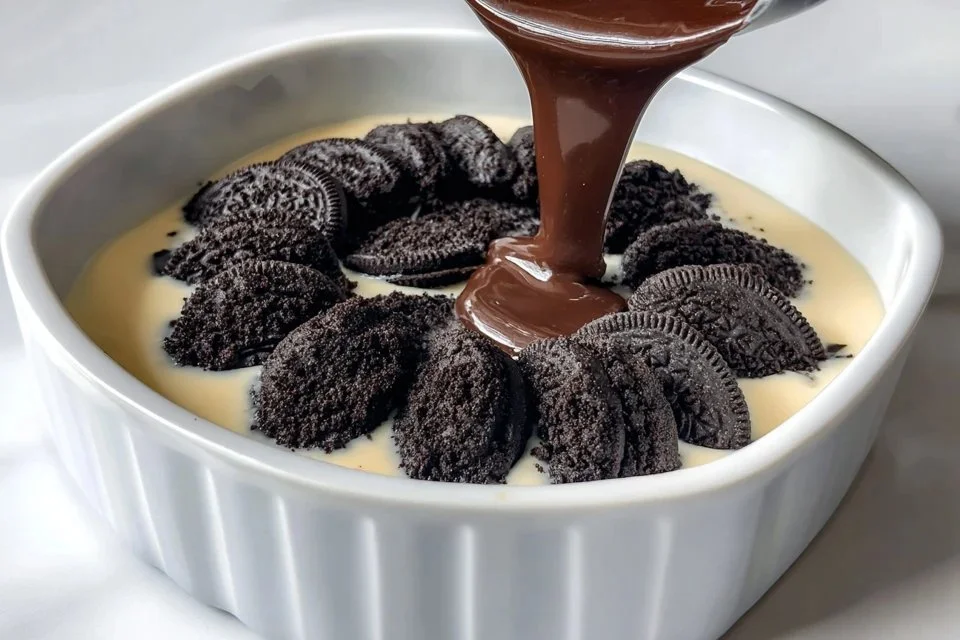
- 25 Oreo cookies, crushed (provides a crumbled texture and chocolate flavor)
- 14-ounce can sweetened condensed milk (adds moisture and sweetness)
- 8-ounce whipped topping (Cool Whip, thawed) (contributes creaminess and lightness)
- 15¼-ounce chocolate cake mix (forms the cake base with a rich chocolate taste)
- ½ cup sweet salted butter, sliced (adds moisture and richness)
Instructions
Step 1. Preheat your oven according to the specified recipe temperature. Grab a baking dish and prepare it by greasing it lightly if needed. This will prevent sticking and ensure smooth serving once baked.
Step 2. In a large mixing bowl, combine the crushed Oreo cookies with the chocolate cake mix. Stir them together until thoroughly blended. This step is essential to ensure a uniform distribution of flavors throughout the dessert.
Step 3. Pour the sweetened condensed milk over the cookie and cake mix mixture in the baking dish. Use a spatula to spread it evenly. This will create a moist base and enhance the overall texture of the cake as it bakes.
Step 4. Place the sliced butter evenly across the top of the mixture. This distribution allows the butter to melt and seep into the cake during baking, enriching the flavors and moisture.
Step 5. Bake the composition in the prepared oven until it is golden brown. Look for bubbling edges indicating that the cake is set and the flavors have melded. Remove it from the oven and let it cool for a few moments before serving.

Serving & Portions
Oreo Dump Cake is typically served warm or at room temperature. It’s usually cut into squares, making it easy for guests to enjoy. Serving it with a dollop of extra whipped topping can elevate the experience. This dish is perfect for casual settings, gatherings with friends, or family dinners, where everyone can indulge in a generous portion.
Pro Notes
- For extra chocolate flavor, consider garnishing the top with chocolate chips before baking.
- Ensure the whipped topping is fully thawed for easier mixing and a smoother texture.
- Customize this dessert with more Oreo cookies or variations of whipped toppings as desired.
Common Problems & Fixes
- Too dry: This can occur if the cake is overbaked. Monitor closely during baking to prevent this.
- Uneven layers: Mixing ingredients too roughly can cause layering issues. Stir gently for a consistent mix.
- Not enough flavor: Ensure you use fresh Oreo cookies for optimal taste. Stale cookies can reduce flavor intensity.
- Messy serving: Allow the cake to cool slightly before cutting. This helps maintain shape during serving.
- Soggy base: If too much moisture is added, the bottom may become too wet. Follow measurements closely to avoid this.
Storage
Store any leftover Oreo Dump Cake in an airtight container in the refrigerator for up to four days. For room-temperature storage, keep it covered for a brief period. If you choose to freeze it, wrap individual portions securely in plastic wrap, then place them in a freezer-safe container. To reheat, thaw in the fridge overnight and then warm in the microwave for a few seconds to retain the delightful texture.
Nutrition Information
Calories, Total Fat, Saturated Fat, Carbohydrates, Fiber, Sugar, Protein, Sodium: Nutrition information is not available.
Frequently Asked Questions
Can I make this recipe ahead of time?
Yes, you can prepare the Oreo Dump Cake a day in advance. Bake it, allow it to cool, and then store it in the refrigerator. This allows the flavors to develop further.
How long does it last in the fridge?
When stored properly, this dessert will last about four days in the refrigerator. Be sure to keep it in an airtight container to maintain freshness.
Can I freeze this recipe?
Yes, you can freeze leftovers. Wrap portions tightly in plastic wrap before placing them in a freezer bag or container.
What can I substitute for one ingredient?
If you need to substitute the sweetened condensed milk, you could use evaporated milk with sugar mixed in, but this will slightly change the flavor and texture.
Why didn’t my recipe turn out as expected?
Variations in oven temperatures or ingredient freshness might affect the outcome. Always ensure your oven is properly calibrated and ingredients are within their best-use dates.
Closing Notes
Making Oreo Dump Cake provides a simple and enjoyable cooking experience. This recipe stands out for its dependable results and ease of preparation, making it a reliable choice for gathering around the table. You can feel confident that each bake will produce a comforting dessert that satisfies.

Oreo Dump Cake
Ingredients
For the Cake
- 25 pieces Oreo cookies, crushed Provides a crumbled texture and chocolate flavor.
- 1 can (14-ounce) sweetened condensed milk Adds moisture and sweetness.
- 8 ounces whipped topping (Cool Whip, thawed) Contributes creaminess and lightness.
- 1 package (15¼-ounce) chocolate cake mix Forms the cake base with a rich chocolate taste.
- ½ cup sweet salted butter, sliced Adds moisture and richness.
Instructions
Preparation
- Preheat your oven and lightly grease a baking dish to prevent sticking.
- In a large mixing bowl, combine the crushed Oreo cookies with the chocolate cake mix and stir until blended.
- Pour the sweetened condensed milk over the mixture in the baking dish and spread evenly using a spatula.
- Distribute the sliced butter evenly across the top of the mixture.
- Bake until golden brown with bubbling edges, then remove from oven and let cool before serving.


Leave a Reply